
Congratulations on successfully passing the third module! 🙂
In this Teaching Speaking fourth course module, we will be taking a look at (4.1) International Phonetic Alphabet (IPA), (4.2) Voiced/Voiceless pronunciation, (4.3) Promoting confidence. It is essential that you thoroughly read through all the information presented within this module, before then completing the Module Quiz and proceeding to the fifth module. If you have any module-related questions, please contact your personal tutor through the CONTACT LESSON TEACHER button. Good luck and we hope you enjoy completing your fourth module! 🙂
Please note that at the end of this module, before the end of module quiz, you will see an assignment which is mandatory to complete to successfully pass this module.
(4.1) International Phonetic Alphabet (IPA).
The International Phonetic Alphabet (IPA) was first introduced in 1888 by the Association Phonétique Internationale – a group of French language teachers founded by Paul Passy. The aim of the organization was to compile a system for transcribing the sounds of speech which was independent of any particular language and applicable to all languages. Then in 1847, Isaac Pitman and Henry Ellis created a phonetic script for English – used as a model for the IPA.
The IPA is primarily used in dictionaries to indicate the pronunciation of words, and for creating new writing systems for previously unwritten languages. And is also utilized by non-native speakers of English when learning to speak English.
Please note that the term ‘Phonetic’ is also referred to as ‘Phonemic’, and both terms mean exactly the same thing.
The International Phonetic Alphabet table:

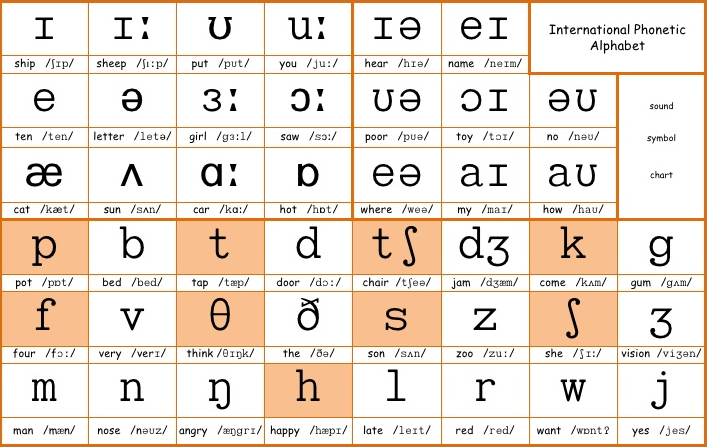
Please also note that as this course is written in American English, there might be slight variations in phonemes depending on which country you reside from. For example, in British English the word cheese is phonetically written: ʧiːz. Whereas in American English, it is written: ʧiz. The differences are minimal, but worth noting nonetheless.
The English language in its standard form has 44 distinct sounds, presented individually in the chart above (phonemes). For each sound, there is an example word given underneath which uses that sound. As you can see, the consonants mostly use the same letters as the regular alphabet to form the phonetic symbol, so they are learned immediately by somebody who is already literate – there are actually only eight of them to learn.
A vowel is a voiced sound made without any closure or friction so that there is no restriction to the flow of air from the lungs.
A diphthong is the result of a glide from one sound to another within a single syllable. These form three phrases: clear pure air, great joy, bright hopeful sounds.
A consonant is a sound produced by partially or fully restricting or closing the flow of air, which may result in friction. Consonants can be voiced or unvoiced (voiceless).
The difficulty presents itself in the vowel sounds at the top: short vowels, long vowels and diphthongs.
Let’s begin with three of the long and short vowel sounds for comparison purposes. We first learn long vowel sounds when reciting the capital letters of the alphabet:
A /eɪ/ I /ɑɪ/ O/oʊ/
say cry go
a /æ/ i /ɪ/ o/ɒ/
cat big hot
Diphthongs sound complicated but they are simply vowel sounds combined with other end sounds like ‘ow’ /ɑʊ/.
Try using the sample words in the chart and in each case see how many other spellings for the vowel sounds you can come up with. You will need to say them out loud or in your head to test them, and you can check your findings in a good dictionary.
Simple variations on well-known games are helpful in familiarizing students with phonemic symbols:
Phoneme bingo: hand out bingo cards with phonemes instead of numbers; call out sounds rather than numbers.
Anagrams: get students to work out anagrams of words using phonemes rather than normal alphabetic letters, for example: /bkʊ/ (= book).
Category words: choose five or six categories – such as ‘Parts of the body’, ‘Sports’, ‘Animals’, ‘Household objects’, ‘Clothing’, etc. – which students should copy down. Students work in small teams. When you call out (and write up) a phoneme, the teams must attempt to find a word containing that phoneme for each category. So, for example, if the phoneme is /æ/, a team could choose ‘hand’, ‘javelin’, ‘cat’, ‘mat’ and ‘hat’. The teams then compare words and points are awarded.
And here are some general ideas for working with phonemes:
- Integrate phonemic work into all your teaching of grammar and lexis. Always work on helping the students to achieve good pronunciation, and encourage them to make a record of the phonemic transcription as well as the spelling of new items.
- Observation of mechanics: let students watch how you and they make particular sounds.
- Ear-training: get students to listen to and distinguish words which have sounds that seem to them very similar (for example. hat vs. hut; thin vs. tin; examples of this kind are known as minimal pairs).
- Tongue twisters, to work on particular sounds or to contrast sounds (for example, Three thin trees and three tall trees).
- Transliteration: get students to write out a word or sentence in phonemic script. Jokes seem to work well.
- Train learners in using a dictionary to find pronunciation as well as spelling.
- Keep a phonetic chart on the wall of your classroom. Focus briefly on one phoneme each lesson.
- Tap out words on the chart and ask students to say the words.
- Use the chart for pointing out correct sounds when students pronounce something wrong.
- Try creating a phonetic crossword. Students complete this in the same way as a traditional crossword but have to fill in phonemic transcriptions of words rather than their spelling.
Teachers often shy away from pronunciation work yet it is key for students.
Pronunciation starting points.
Pronunciation can be an overlooked area of language teaching, partly because teachers themselves may feel more uncertain about it than about grammar or lexis – worried that they don’t have enough technical knowledge to help students appropriately. However, when teachers take the risk, they are often surprised to find that it makes for very enjoyable and useful classroom work.
Model new words in context.
When you teach lexical items, give learners a chance to hear you saying the item naturally spoken in the context of a typical short phrase or sentence. Take care to stress naturally (rather than as a ‘perfect’ sentence). Allow students to repeat the phrase and give them honest feedback if there seem to be problems. If necessary, remodel it and let students work out what they are doing differently.
Modeling intonation.
When you teach grammar, allow learners to hear some typical examples of natural uses of the language. So, for example, when teaching the Present Perfect Continuous, don’t just teach it as dry examples, but model a typical real-life sentence or two yourself with real feeling, such as, “I’ve been waiting here for two hours!”. A loud, angry sentence like this will be much more memorable than a written example. Get students to repeat it to each other – and don’t let them get away with flat, dull intonation. Encourage them to say it with real feeling.
Use dialogues.
When you work with printed dialogues, don’t just read them silently, but get students to spend time thinking about how to say them. A useful task is to ask them to go through the text deciding and marking which syllables are stressed. After that, students can practice them, read them out and eventually perform them without scripts. The aim is to speak naturally – which is hard to do when you are reading from text, so it’s important to include some text work. Don’t worry about students learning it word-perfectly; give feedback on whether they get the feeling right or not, rather than whether they get the grammar spot-on.
Chants.
A ‘chant’ is a poem or dialogue particularly suitable for reciting aloud; it often involves strong rhythms, clear everyday conversation, often exaggerated feelings and a lot of repetition. Use published chants specially written for language students, or write your own. Aim to help students to learn them by heart so that they can say them confidently with suitable pronunciation. Teach them by modeling them line by line and asking students to repeat them. If you offer dull flat intonation yourself – or if students respond with dull flat intonation – there is little purpose in the activity. You might want to go for the enjoyment of exaggerating the feelings and volume!
Voice settings.
One interesting approach to pronunciation may sound a little odd at first. It’s based on the idea that, rather than work on all the small details of pronunciation (such as phonemes, stress patterns, etc), it might be better to start with the larger holistic picture – the general ‘settings’ of the voice. If you think about a foreign language you have heard a number of times, you are probably able to quickly recall some distinctive impressions about how the language is spoken – the sorts of things that a comedian would pick on if they wanted to mimic a speaker of that language; for example, a distinctive mouth position with the lips pushed forward, a flat intonation with machine-gun delivery, a typical hunching of shoulders, frequently heard sounds, a generally high pitch, etc.
(4.2) Voiced/Voiceless pronunciation.
Many consonant sounds come in pairs. For example, P and B are produced in the same place in the mouth with the tongue in the same position. The only difference is that P is an unvoiced (voiceless) sound (no vibration of the vocal cords) while B is a voiced sound (vocal cords vibrate).
The following are some examples of Voiced and Voiceless IPA sounds. Try putting your hand on your throat as you say the phonemes to see if you can feel the difference.
Voiced.
| b | book (bʊk) |
| v | vanilla (vəˈnɪlə) |
| ð | they (ðeɪ) |
| z | zero (zɪroʊ) |
| d | dish (dɪʃ) |
| ʒ . | genre (ʒɑnrə) |
| g | good (gʊd) |
| ʤ | jump (ʤʌmp) |
Voiceless.
| p | please (pliz) |
| θ | thirty (θɜrdi) |
| f | five (faɪv) |
| s | sir (sɜr) |
| t | ten (tɛn) |
| k | king (kɪŋ) |
| ʧ | cheers (ʧɪrz) |
| ʃ | she (ʃi) |
(4.3) Promoting confidence.
The last section of this module looks at techniques for correcting students in ways that promote student confidence.
In most things, humans largely learn by trial and error, experimenting to see what works and what doesn’t. It is the same with language learning.
Student errors are evidence that progress is being made. Errors often show us that a student is experimenting with language, trying out ideas, taking risks, attempting to communicate, making progress. Analyzing what errors have been made clarifies exactly which level the student has reached and helps set the syllabus for future language work.
In dealing with errors, teachers often look for correction techniques that, rather than simply giving students the answer on a plate, help them to make their own corrections. This may raise their own awareness about the language they are using: ‘What you tell me, I forget; what I discover for myself, I remember.’
Errors can present themselves in various forms. Try matching the errors in the following list with their descriptions:
1. Alice like this school. / A. Pronunciation (/ɔ/ vs. /ʌ/)
2. Where you did go yesterday? / B. Pronunciation (/ʃ/ vs. /ʧ/)
3. The secretary is in the office. / C. Pronunciation (word stress)
4. Give me one butterbread! / D. Grammar (wrong tense)
5. I eat shocolate every day. / E. lexis (incorrect collocation)
6. After three years they made a divorce. / F. Grammar (verb-noun agreement)
7. I am here since Tuesday. / G. Grammar (word order)
8. I’m going to paunch you. / H. Lexis (incorrect word) – and rude!
Please be reminded here that we use the words ‘vocabulary’ and ‘lexis’ interchangeably, but essentially they are two terms for the same definition.
Sometimes language can be grammatically correct but completely inappropriate in the context in which it is used. Errors can also be made in intonation and rhythm; in fact, wrong intonation seems to cause more unintended offense to native speakers than almost any other kind of error.
Five teacher decisions have to be made when working with oral errors in class:
1. What kind of error has been made (grammatical? pronunciation? etc.)
2. Whether to deal with it (is it useful to correct it?)
3. When to deal with it (now? end of activity? later?)
4. Who will correct (teacher? student self-correction? other students?)
5. Which technique to use to indicate that an error has occurred or to enable correction?
Let’s look back at decision two in the list above. What are your criteria for whether to give on-the-spot immediate correction or not?
An important consideration here is the aim of the activity. Is it to improve a learner’s accurate use of English? If this is the case, then correction may be helpful.
However, if the activity is aiming to encourage fluency, interruptions and corrections might get in the way of the work.
When to correct.
There are other factors to take into account when deciding if a correction should be made: Will it help or hinder learning? Am I correcting something they don’t know? (If so, there doesn’t seem much point.) How will the student take the correction? What is my intention in correcting?
Decision three is about when to correct. The options include: immediately; after a few minutes; at the end of the activity; later in the lesson; at the end of the lesson; in the next lesson; later in the course; never. The distinction between accuracy and fluency aims is again important here. If the objective is accuracy, then immediate correction is likely to be useful; if the aim is fluency, then lengthy, immediate correction that diverts from the flow of speaking is less appropriate. We either need to correct briefly and unobtrusively as we go or save any correction for after the activity has finished or later.
Decision five concerns techniques to indicate that an error has been made or to give or invite correction. The following two steps can be used to encourage student self-correction or student-student correction:
1. Indicate that an error has been made. You may also indicate what kind of error it is, where in a sentence the error is, etc.
2. Invite correction or help the student towards a correction.
One strategy used by many teachers during fluency activities is to listen in discreetly and collect a list of overheard errors. Later on, you can use this list to provide sentences to discuss, to set an exercise, to plan the next lesson, etc.
Some ideas for indicating / correcting errors:
- Tell students that there is an error (for example: ‘There’s an error in that sentence’) .
- Use facial expression: surprise, frown, raised eyebrows, interest, etc.
- Use a gesture combined with a facial expression (for example: worried look and hand outstretched to ‘hold’ the sentence – you won’t let the class move on until they deal with the sentence you are ‘holding’) .
- Use finger correction (hold on to the ‘error’ finger, for example, the third word).
- Repeat sentence up to error (for example: ‘They looked for a . . . ?’) .
- Echo sentence with changed intonation or stress (for example: ‘You go to a disco yesterday?’ or ‘He wanted to eat a kitchen?’) .
Whichever correction techniques you use in your classroom, ensure that they promote learning and learner confidence.
Over to you!
Having read through four modules, it is time for you to develop your first (original) lesson plan. We want you to enjoy the freedom of choosing to create any lesson plan that you wish for this assignment. This means that it can be for any level, for any age group, for an individual or group class. You also have the freedom to choose which language area you want your lesson plan to focus on, and how long the class will be taught for. You may use pen and paper, take a photograph, and then email it to us as a PDF document, or you can of course use your electronic device to create the lesson plan. Please email your completed lesson plan to info@teflonlinepro.com with the email subject: YOUR NAME + LESSON PLAN 4. You may then continue to the Module 4 Quiz below and proceed as usual. Your lesson plan will be marked and feedback will be given shortly afterwards.
Congratulations on reading through the fourth module!
Now it’s time to take the Module 4 Quiz, after which you will gain access to the fifth module.
Important! We recommend reading through the fourth module again to ensure that you are fully prepared to take this quiz.
Click on the VIEW THE LESSON QUIZ button to proceed to the Module 4 Quiz…